Friday, April 18, 2014

Operation Classical Tutu: Phase 2 - The Gathering

The Gathering of the Tulle is quite a fun process as far as the actual gathering goes.  I developed this technique of gathering fabric after doing many of the Portabellopixie Gracie ruffle skirts.

First I find out the length of the final piece of tulle - so basically, it's the hip measurement of the tutu.  This seems to be a little bit complicated because the top layer ends up having a slightly smaller circumference than the bottom layer because of curves.  However, as you don't want to stretch the lycra as you sew, I just make it for the top layer and it works out through the sewing anyway the way I do it.

So, measure across the leotard, then double it.  

I get some fishing line.  I've been using 6lb, 0.25mm line, it's thick and visible but not too thick that it doesn't bend well.  When I sewed cotton fabric, I was using yarn mainly because that was within arm's reach at the time, but yarn would get caught on the edges of the tulle and cause bad words, so I decided on fishing line.

I tie a loop in the end of the fishing line, and triple knot it so that the knot is quite big.  Then I measure the length I want my tulle to be and do single knotted loop at the end of that, re-measure to make sure it's in the right spot, then add another two knots.  Then snip the length off the fishing line.

I make all the lengths at once - I need 6 for this tutu - and stick them in a drawer next to my machine. I put them in the drawer only because otherwise my cat thinks they are for playing with.  

You can see the loops in the picture below..... maybe.


To gather, I use the cording foot on my sewing machine.  I put the first loop out on the back side of the work, then snap the fishing line in to the middle cording groove.  I set the machine to a wide, long zigzag stitch (5.0w x 5.0l).

I also use invisible thread for all the gathering, sewing on the tulle and tacking.  It's pretty great stuff and I haven't had a problem with its strength as yet.  It's so fine you'd think it'd snap, but it holds up to a lot of pulling.  I mean, don't try to break it with your hands if you do so with cotton thread, ouch!  Using the invisible thread makes all the work for the skirt disappear.  It also cuts down on the bulk around the middle.  Plus, no colour matching needed - I hate standing at the Gütermann stand with a piece of fabric trying to decide between two (or five) slightly different shades of a colour to colour match......then getting home to realise it shows up quite well on the fabric when sewn.

As I am sewing, I line the right hand side of the foot up with the edge of the tulle, and the cording foot keeps the fishing line right in the middle.  Makes for a nice, even gather.

I hold on to the other loop as I sew, and it bunches the tulle up at the back, gathering as I sew.  Be careful not to gather it too much right at the back of the foot, or you can start to sew over the top of your gathers, so stop occasionally and play the tulle out along the line so you know it's sitting well.

Picture below shows the cording foot and the gathered tulle at the back.


As I'm done each section I hang them on a hanger in order.  I swear, the amount of times that I have had to remeasure a piece to know what number layer it is is ridiculous.  It is actually pretty important to keep your layers numbered and fastened together separately from the cutting to the sewing.  Going with the assumption you like your sanity.....


Stay tuned for Phase 3: Sewing the Tulle to the Leotard.......


Thursday, April 17, 2014

Operation Classical Tutu

I have fallen in love with sewing dance wear.

I have made a few outfits for performances to date, but that elusive Classical Tutu has been just out of reach.

I have made a couple of tutus so far to learn, but they have no practical use other than learning tools.  Here is a few pictures of the last one I made (although haven't finished embellishing):


The girls' dance teacher (also known as the best dance teacher a little girl could have) decided against a Classical Ballet solo for this year.  Bah, no tutu.

Well, yesterday I got the amazing news that my 8 year old's Demi Character routine will involve needing a Classical Tutu.

So, with the brief of a white, classical, competition tutu, I made sure to get to Spotlight before work yesterday - found they had 40% off dance velvet - BONUS!  So, bought twice what I needed, because that's what sewing logic is, right.  Riiiiiiight??

So, Phase 1 of Operation Classical Tutu began last night with the construction of the leotard.

I use Dani Legge's stretch tutu pattern.  This pattern is the bomb diggity, and if you are in any way thinking of making a stretch tutu, grab the pattern.  I bought it from Tutus That Dance.

Here is the result of Phase 1:


I wanted the panties to be in plain lycra, so I chopped the pattern where the tulle will sit so the transition is hidden in the tulle.

The top of the bodice is white Dance Lycra lined with white lining fabric, the bottom of the panties are two layers of white Lycra.

The front seams are topstitched with a twin needle on the outside of the middle panel.  and the waist seam on the upper side of the seam.

I used 10mm elastic around the neck and back, as I think it gives it a little more hold and looks nice and substantial too.  The leg openings use 6mm elastic.  I use woven elastic for all my dance wear, I cannot make the swimwear elastic (the plastic stuff) work for me and my overlocker, and I have settled on this working best and I know the feeling of how much pressure to put on when I pull the elastic to stretch as I overlock.

I had been tossing up about a nude insert on the bodice, but we decided against it.

You can't see too well on the picture, but I have sewn two lines of basting for the borders of the tulle (top and bottom).  I get quite stressed out when my tulle doesn't sit in nice, parallel lines on the inside of the tutu, so this helps with my placement.  This is one of the throwbacks from having my first craft love being cross stitch.  Cross stitchers are almost as fanatical about having the back of the work looking almost as pretty as the front.  This is unfortunate when you move on to other disciplines - intarsia knitting has always been something I struggle with because of the inside of the work.

I have left the crotch open, but have overlocked the elastic in place already.  I find that trying to overlock elastic onto a tutu with tulle on it to be a recipe for bad words.  I also do not turn and topstitch the edges until the crotch is sewn up.  Means I have to make sure to stay right away from the edges when I'm sewing the tulle on.


Stay tuned for Phase 2: The Gathering (of the Tulle)........

Thursday, January 9, 2014

Lyrical Costume (with Asymmetric circle skirt mini-tutorial)

I am getting prepared for the coming year.  Even though we are changing dance studios and don't have routines sorted, well, we actually don't have an enrolment in yet lol, I have decided to make sure I have the costumes sorted ahead of time so that I don't get overly busy and have to push it too hard just before a routine needs it.

So this one is for Miss 13.  She gave me a stack of pictures from the internet of what type of thing she wanted, and I went with this look.

Asymmetric sparkle chiffon skirt over some hot pants, one sleeve top with a sparkle chiffon drape, gathered at the shoulder.  

I have to figure out a headpiece, but I actually think the bit of chiffon I wrapped around a simple bun looks lovely in itself.


Both top and hotpants are from patterns from Tumblentwirl on etsy.  Both are in one of the trainingwear packs from memory.  

For the asymmetric skirt, I cut a circle as for a circle skirt and then moved the middle circle off centre by 2 inches.  

A little bit of a tutorial - this assumes you already have knowledge of making a circle skirt:

1. Fold the fabric in quarters.

2. Cut the outer circle.  First do the math:

Brielle's waist is 29 inches - add an inch for stretching over the hips - 30 inches.

Divide the circumference by pi (3.1415) and then divide by 2 - that gives the amount from the corner the waist will be.  In this case 4.75 inches.

Add the length you want the skirt to be.  I wanted the middle of the skirt (in line with her belly button) to be 10 inches, with it evenly skewed left and right of that point.

So I cut the big circle at 14.75 inches from the corner.

3. Unfold the fabric.

4. Fold the fabric in half.

5. Measure from one of the ends of the straight edge the difference in height you want your right and left sides to be.

In this one, I wanted the right side to be 8 inches (middle 10 inches) and the left side 12 inches. 

So that is 4 inches from the end on the straight edge.

6. Fold your top two layers over to this measurement.

7. Measure and cut your inner circle from the corner (mine was 4.75 inches remember).


And there you have your asymmetric skirt cut out.

I just sandwiched this between my shorts and waistband as I was sewing it together.  Ta-da!  

Being chiffon, just threw a rolled hem onto it to finish it off.  The drape over the top was a bit more painful, and I don't have it sorted to sit right yet, so have to decide how to secure it for dancing.


Sunday, January 5, 2014

Poolside Pattern Release

I finally released a pattern I have had in testing since about August.  Not that the test took that long, rather that I just have so much on that I just let it lapse.

The pattern is called Poolside and it's a cute little top which is great for the hot hot hot days we've been having here in Brisbane lately (41 degrees yesterday eep).  In 8ply and 10ply, sizes 1-12.


I decided to finish it off and release it as there is a KAL on Ravelry in the Budding Designers Downunder group featuring my patterns this month.  I also put all my patterns on 30% off for January if you wanted to grab any cheap.  If you aren't on Ravelry, sorry for Rav Links, but seriously, if you knit, you should be on Rav anyway!

Happy Knitting!

Saturday, January 4, 2014

One sleeve Leotard

Miss 8 is working on getting her idea for her Jazz costume for next year across to me.  So far she's gotten me to make up a one sleeve leotard, now we need to get a 'cutout' done across the belly on one side.

So, this is the leotard.  It's done from a pattern from an etsy seller tumblentwirl.  Her patterns are great for dance wear, affordable and easy.  I have many of her patterns.


Here it is with the skirt from yesterday's post.  Honestly I think this would be a cute little outfit on its own (if it were embellished a little bit perhaps).  


Here is the darling looking beautiful <3


Friday, January 3, 2014

New Adventures, New Passions, New Beginnings

It's been a long 13 months since I've touched this blog.  In that time, I have gotten a part time job outside the home, my children have grown and I've discovered some new crafting loves.

My middle two daughters have discovered dance and as a follow on, I have discovered sewing dance wear.  

I don't have much time outside of work and kids to get any pattern designing done, I have started some test knits, but haven't had the followthrough to get most of them completed and pattern released.

Funnily enough, the one I have released was a ballet wrap!

I am diving into tutu making now.  And other dance costuming.  It's a journey I will be sharing as I grow and learn.  

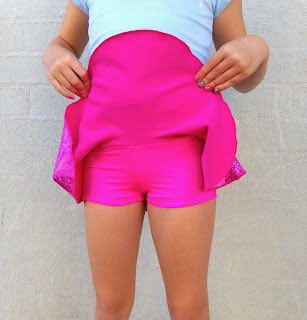
Here is a jazz skirt I made, modelled by Miss 8.


This was created for a friend whose daughter outgrew her current skirt for her jazz solo.  I looked at the skirt and tried to replicate the general feel of it, drafted the pattern and did this skirt as a mock up for style and sizing.

She loved it, so I made the real one for her.


It's got a little pair of pants sewn underneath.


I was really happy with the results.  I cannot wait to see it in action, she's a talented little dancer, looks great up on stage, and was the highest placed soloist in the studio at the last eisteddfod from memory.

Thursday, November 1, 2012

Frankenskein Part 2

*phew*

Nowhere near as bad as I was imagining.

Infact, it's quite nice.  Somewhere inside I am hoping the recipient doesn't really like it and I can keep it.  I know this is not going to happen however.

Here is the Frankenskein in as-dyed skein format:


In the centre at the top there is a darker patch, directly opposite that is a lighter patch.  You can't really see it very well.  Here is a close up shot, but I don't think you can see it here either.


And here is reskeined:


It's hard to capture the correct colours, but you get the point.  It's looking pretty good.  May need a little bit of alternating, and won't be consistent throughout the knit, but it's lubberly.

While I had the yellow dye out I did a few others.

These skeins are both WOOLganics 12ply.  I wanted to see what a bit more heat and a bit more time did to the WOOLganics yarns:


I don't know what I'm going to do with these two skeins.  I have been working on the Ultimate Soaker pattern, so maybe I'll do a run of the 12ply pattern, one of each size in these.  Or I might sell them.

A Halloween Story in which I Dye

It was a bright sunny day when I decided it was the right time to get some dyeing done.  I had some yellow yarn to dye for a lady I adore and respect very much.  All the children are at school and I have a while before they get back.

I put the pot on the stove and put a wire tray in the bottom so that the dye doesn't darken upon contact with the hot base of the pot, making it patchy.  This is a trick I just recently realised I should do.


I start heating the hotplates and add in my dye.  I swirl and swirl to make sure the dye is all dissolved, as I know this yellow can take time to dissolve.  Fortunately, this is a lot easier in hot water than in cold dyeing, so it happens quickly.  I test the water by first drawing some up in a big syringe to see the colour in true light, then I dip some tissues in to see how it comes out on white.  Looking good, but I will have to be careful using this superwash yarn, the last time I did this with yellow it took up too much dye and turned orange, because I hadn't used these dyes with superwash yarn before, only my other dyes.

The temperature comes up.  It's ready for the dyeing.

A quiet descends, a calm comes over me.  I'm in the zone.  The Dye Zone.  I am focused on my craft.  I am at peace.

A dip of the end, and quickly out..... nice.

A dip of the middle, and quickly out..... very nice.

It's taking the dye well, evenly, and if I'm careful, not too heavily.

I don't notice the foreboding shadows passing over the dye pot.  A grim grey colours the air.  I still don't notice.  I'm still in The Zone.

I am about to make another dip, to cover the area in between the two sites already coloured when....

BOOM!!!  CRASH!!!! BANG!!!!!!

I stifle a scream and jump with a small whimper.  Good Lord what was that?

Being wrenched out of The Zone, I become aware of my surroundings.  It is dark, it is stormy.  It was a massive peal of thunder which startled me.

Goodness me, the yarn!!!

It has fallen into the pot, it's going to take too much dye.

I thrust my hand into the boiling pot and grab the end of a zip tie.  My hand scalds, but I get a grip on it.  As I pull the steaming hot yarn out of the pot, the zip tie tightens.  OH NO!!  That means the dye in the sitting water in the skein isn't going to be getting to the yarn under the tightened area.

I work and work on opening up the zip tie.  I'm sure an evil genius invented these blasted things.  I'm holding the hot yarn over my forearm as I do it, keeping the rest of the yarn out of the pot.  Just as I'm about to give up and cut the zip tie, which in hindsight should have been my first move, I get it open.

OH NO!!!  The end of the yarn had been dipped in the pot the whole time.  Now I think it's taken up too much dye.

This is bad..... very very bad.....

There are more claps of thunder, I look out the window towards the storm..... It's half an hour to school let out, this storm is going to hit just before the bell goes.  Of course, 3 o'clock is Storm o'clock.

Trying to undo my mistakes, I know that I have to get the heavily dyed area into a SOAK woolwash as soon as possible to try to minimise the mistake.  I also have to try to dip the under-dyed end in the pot to get the colour in that area.  My scalded hand is throbbing a little, but I know it's not burned.

I also realise that I need to rush to school and pull all three of the primary school kids out before the storm hits.  Rushing the yarn into SOAK after fixing the under-dyed area, I give it a quick swirl.

I rush out the door with a few umbrellas and get up to the school quick smart.  I almost make it home with the three girls before the storm breaks.

Of course, the storm lasts until about 3:15 before clearing up and the day was sunny once again.

Time to rush around for ballet and get kids ready for trick or treating.


During the trick or treating that night...... out comes the full moon.

Of course.


***END OF PART 1 - JOIN ME FOR PART 2 WHEN I FIND OUT WHAT THE YARN LOOKS LIKE***

Saturday, August 25, 2012

Sewing Weekend

I'm sewing a Peasant Skirt from the Portabellopixie Gracie pattern today.

I'm going with some beautiful Pear Tree by Thomas Knauer fabric from Hawthorne Threads.  It's one of my favourites.


I do have a bit of a pin addiction when it comes to ruffles though..... I may have to seek help about this one day.


The resulting skirt will be used as a demo for the customs of this skirt I will be offering on my Facebook Page.  I love designers who grant personal sales use of their patterns, and in fact, Sandi Henderson and her Portabellopixie patterns are what inspired me to make all my knitting patterns license free.

Sunday, July 29, 2012

Dye Techniques: Space Dye in a Circle

I've decided to document the different techniques I've used dyeing yarn in my time.  Usually I don't stick to the same technique for an extended period, so I've tried many many different ways so far.  

This is the latest way I've tried space dyeing, cold dyeing with containers under the yarn to keep the colours separated and less messy.  This is a good method if you want to do repeatable colourways, because it would be easy to keep track of colour positioning and proportions.

Start with a nice soak in water with some white vinegar and squirt of washing up detergent. I like to loosely tie my skeins with a zip-tie, that way it's easy to grab the skein up out of dye, and is secure if the yarn ties snap so you don't get a tangled mess.  Make sure it is tied loose though so that it doesn't hinder the dye uptake process and leave a white stripe on your yarn.  Squeeze out the excess water before starting to dye, you want the yarn to be wet but not sopping wet.


Mix up your dyes.  I bought a bunch of small drink bottles I bought from The Reject Shop.  I like to make my dyes up a few hours at least before doing the dyeing.  This makes sure all the granules of dye have a chance to dissolve in the water.  There's nothing worse than undissolved dye granules making dots on your pretty yarns.  The reason I use the squeezy drink bottles is then I can squeeze the dye into the yarn making sure to saturate all the yarn with the dye, easier to do squirting it on.  I have a piece of paper towel on hand to check what colour I'm about to use, since I went and bought coloured drink bottles.


Lay your yarn on some divided trays.  I got this pack of three for a couple of bucks from Overflow.  make sure the yarn is evenly distributed around the circle, dipping into each section.  Squeeze your dyes into the fibres, making sure you get the dye into all the undyed sections.


It's unlikely that your first application will get all the fibres dyed, so I take a big 60ml syringe and suck up the liquid from the container and squeeze it over the rest of the yarn.  At one point when I think I have all the fibres dyed, I flip it over to see the underside.  More often than not, the underside has white patches, or unevenly dyed sections.  In order to get a good match at the beginning of your skein to the end of the skein, it's best to try to have it homogenous throughout the thickness of the skein.


A slightly tricky part of the circle is wrapping in glad wrap.  I do one container at a time, wrap it and take the container away, trying to keep colours from touching each other.  I don't want to spend a bunch of time dyeing yarn to have them bleed together during cooking.  Try to resist the urge to squeeze out too much of the excess dye, as it will absorb into the yarn during the cooking. 


All wrapped up and ready to go.


I place it on my microwave tray where it was dyed.  Again, trying very hard to keep the colours from touching.  During the cooking, the glad wrap can melt onto itself and if yarns of different colours are touching, they will bleed together.


Microwave for 2 minutes, rest for 2 minutes.  Repeat a few times.  Like 3-4 times.  If you think you are over exciting the fibres, they will felt and it's time to stop.  Try to not touch or play with them during the heating/resting process, because heat + agitation = felting.
LET THE YARN COOL COMPLETELY before unwrapping.  The dye is set upon cooling, if you rinse before it's cooled the colours will dull.


Rinse your yarn in lukewarm water, if you let your yarn cool completely, there shouldn't be very much rinse out, although blue and black might bleed and bleed and bleed.  Then you soak your yarn in some lukewarm woolwash, I suggest SOAK, it's kind on fibres and smells delish.


Hang your skein out to dry.  Another benefit of the zip-tie, it's great to hook up for drying.


Reskeining I do by hand right now.  I dream of one day having an electric skein winder, but alas that is not my current situation.  I use a swift (this one made by Julia's husband Blair, you can buy them on her blog) and a niddy noddy.  This one I made, just a few bibs and bobs from Bunnings, I'll do a post about it one day.


The reskeining process, my favourite part.  I love seeing the colours meld together.  *bliss*


And the reskeined goodness.  Just sublime.


Shan xx